|
Remote Playback System
The Remote PlayBack System (RPB system) allows you to playback GV-System's video event from a remote
workstation through TCP/IP connections. The RPB system is consisting of two components: the RPB server
and the RPB workstation. Each RPB server will handles up to 16 RPB workstations login at the same time,
and each RPB workstation will be able to playback 32 channels simultaneously.
5.1 RPB Setup and Installation
Before you can run RPB functions in GV-System both RPB application and RPB server should be properly setup and installed first. This section will explain the detail on how to setup RPB workstation and to establish its
connection to the GV-System.
5.1.1 Install RPB Application
The RPB application is included in your GV-System CD-ROM. This Application should be installed in a separated PC with TCP/IP network access. Please make sure your PC meets the minimum system requirement indicated below before proceeding to the installation.
System Requirement
|
OS: |
Win 98SE, ME, 2000, XP |
|
CPU: |
Pentium 500 (minimum) |
|
Memory: |
128 MB RAM |
|
Hard Disk: |
20 GB (minimum) |
|
VGA: |
NVIDIA GeForce II 32MB at 800 x 600 resolution (minimum) |
|
Network: |
TCP/IP |
Installation
1. Insert GV-System CD into the CD-ROM drive of the remote workstation and run Setup.exe in the CD-ROM root directory.
2. In the setup dialog box select "Remote Playback. Client Site" and click [Next].
3. Click [Browse] if you wish to specify another destination directory otherwise click [Next] and follow the rest of the instruction to complete the installation.
5.1.2 Start and Stop RPB Server
The GV-System's RPB server must first be activated before a RPB workstation can login to the
system. Only authorized users can access to the functions and controls of RPB server. To assign an authorized user accounts please refer to chapter 3's password setup for detail.
1. Click RPBsvr.exe in the GV-System directory and the following window will appear.
2. Click the
 [RPB Connect] button and the following dialog box will appear, input an authorized user's ID and password in the user login window, then click [OK] to establish connection to the network.
3. The RPB server in your GV-System is now connected to the network. A connection record will appear in the RPB server window indicating its current connecting status.
4. To stop RPB server simply click the [End Connection] button. The system will again ask you for authorized user's ID and passwords. Input the correct information and click [OK] to disconnect it from the network.
5.1.3 RPB Server Setup
There are various tools and options available for you to customize your RPB server. Click the [Option] button from the RPB menu bar then select [Setup]. The system will ask you for a valid ID and passwords. Input proper information and the RPB setup window will appear.
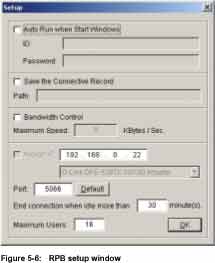 |
Auto Run When Start Windows
Enable this option to auto run RPB
server when startup Windows. Input an authorized user account in ID
and Password column.
Save the Connective Record
This option allows you to keep records on whom and when has login to the RPB Server. You can
specify a folder in the file path to keep these login records.
Bandwidth Control
This option allows you to control the network transmission bandwidth of your RPB server. Adjustable range is from 0 to 1,000 kbytes/sec.
|
Assign IP
The RPB server will automatically detect your GV-System's current IP and display it in the IP address column next to [Assign IP] option. If your GV-System is equipped with two network card each using its own IP address, then you can enable the [Assign IP] option and select which network card to be used in the drop down list.
Port
You can specify which port you like to use for RPB server, the default is "5066".
Close Connection When Idle
Enable this option if you wish to terminate the connection of a login RPB workstation that has been idle for a long period of time.
Maximum Users
You can limit the number of workstations allowed to login to RPB server at a time. The maximum numbers allow is 16 workstations.
5.2 Functions and Features of RPB Application
This section will describe the RPB application's major function and features. To start RPB application, click RemotePlayBack.exe in your workstation and the following screen will appear.
5.2.1 Main Screen Functions
This section will explain the major functions and tools of the RPB main screen. The RPB Function Panel and RPB Playback Control Panel will be explained in 5.2.2 and 5.2.3.
Camera Layout Panel
The camera layout panel allows you to choose from 8 different display layout options.
Page Select
You may choose to go to previous page or next page.
RPB View Window
Displays your selected video event.
Exit Minimize Button
Allow you to close the RPB application or minimize it in the Window's task bar.
5.2.2 RPB Function Panel
The RPB Function Panel contains 8 major function buttons.
Connection Button
Click the [Connection] Button from the function panel and the RPB login window will
appear.
1. Enter the IP address or DNS of the RPB server you wish to login to.
2. Input a valid ID and password.
3. Specify the port number of the RPB server
4. Click [Connect] button to establish connection to the RPB server.
Disconnect Button
Click the [Disconnect] button and there will be two options available: Close All Connections
and Select Disconnection.
Close All Connection: This will terminate all RPB server connection.
Select Disconnection: Allows you to choose which RPB server you wish to disconnect.
Search Button
There are two type of search function in RPB application, which are normal search and
advance search. Click on the [Search] button and a menu will appear for you to choose
between the two.
Normal Search
Select Normal Search and the Search & Download panel will appear
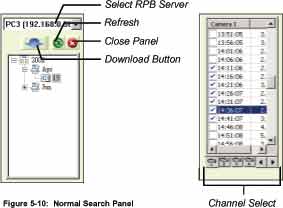 |
1. Select RPB server in the drop-down list.
2. Select the date in the folder tree.
3. All video files within the selected date will be listed in the Event List Window.
4. Select the files you wish to play or download by enable its check box. You're allowed to make multiple selections. After making your selection click the [Download] button and the following window will appear.
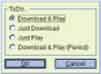 |
5. There are 4 options available to play or download your selections.
Download & Play: This option will play your selected video file and in the same time download them into the RPB workstation.
Just Download: This option will download your selected video or audio file in the RPB workstation.
Just Play: This option will play your selections without downloading any files to your RPB workstation.
Download & Play (Period): This option is available when only one file is selected. It allows you to specify how many frame to download instead of downloading the complete file.
Advance Search
You can search for video file that was recorded during a specific period of time by using advance search panel's search criterias. There are 3 search criterias available: Server name, cameras, and time period.
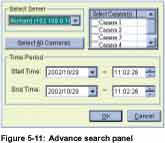 |
1. Select server in the drop down list and all available cameras of the selected server will be listed at the right.
2. Click [Select All Camera] button if you want to download all camera's video file or select the camera you wish to download in the camera window.
3. Specify the start and end time of your search range in Time Period area and click [OK] and a window will appear with 4 options for you to choose from (see Normal Search's step 5). Make your selection and click [OK] to start the process.
Note:
1. The maximum connection channels are limited to 32 channels.
2. When the video event you choose to download is bigger than the storage path you specify then a warning message will be shown.
Play Local Video
Click on the [Play Local Video] button and you will be able to play a downloaded file from the
RPB workstation's local file path.
List View
The List View provides 3 options, which are Channel List, Connect List, and Download List.
Channel List
The Channel List will list out all channels that are currently playing or displaying a video file. The first field of the list indicates the channel number, the second field indicates the server's name, and the last field indicates the file name of the video event. You can use the [Up] and [Down] button to move files from channel to channel.
Connect List
Allows you to see which RPB server you are currently connected. The first field indicates the Server's name, the second field indicates the server's IP address, the third field indicates the number of task your workstation is performing with the server, and the last field indicates the server login time.
Work List
Click on Connect List's [Work List] button and the following window will appear. The Work List show you the task detail of your RPB workstation. You can click the [Back] button to return to Connection List window.
Download History
The Download History displays the current download status of your RPB workstation. The Ratio field shows you each file's download progress and the Save Path field shows you the location your file downloads to. User can now playback downloaded files directly by double clicking the file from the download history.
Connection Record
There are 3 functions under [Connection Record] button, which are "Save Connective Status", "Load Connective Status", and "Load Resume File".
Save Connective Status: This function will save your current connection status in your RPB workstation.
Load Connective Status: Allow you to load Save Connective Status from the workstation.
Load Resume File: Allow you to load interrupted download file that was save as *.rsm (resume) file.
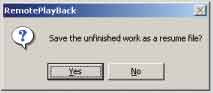
Note:
1. When you interrupt a download file, a message will pop-up asking whether you want to save the unfinished work as *.rsm (resume)
file.
Address Book
The address book allows you to create various RPB server profile. The RPB server profile
contains all information necessary for a automatic login.
Create new group:
Click [New Group] button to create a new group in your Address Book. Give a name for your new group in the group profile text column. A group should contain a numbers of RPB servers.
Create new server:
Click [New Server] button to create a new server. You can categorize various servers under one group. You can do this by selecting a group from the address book then click [New Server] button. The new server will be created under the selected group.
Define new server:
When creating a new server, you will need to define new server's profile by key in its information. There are total 5 fields in the server profile, which are...
| Server Name: |
Enter a name for the new RPB server. |
| Server Address: |
Enter the RPB server's IP address. |
| ID: |
Enter an authorized user's ID. |
| Passwords: |
Enter the authorized user's passwords. |
| Port: |
Specify a network port for your server. |
Delete group or server:
Select a group or server from the Address Book and click [Delete] button to remove it from the Address Book.
Login to server:
Select a RPB server from the Address Book and click [Connect] button and your workstation will login to the selected RPB server immediately. You can repeat this operation to login to multiple servers at the same time.
Preference Setting
[Download]
Always overwrite files: If this option is selected then the next time you are downloading a file that already exit in the RPB workstation, the system will simply overwrite it without warning messages.
Always tell me when download is finished: If this option is selected then when downloads are completed, the system will notify you with a "finish download" message.
[Channel Text]
Select the information to be displayed in the RPB view window.
5.2.3 RPB Playback Control Panel
The Playback Control Panel allows you to controls the playback of downloaded files or play files. This panel includes the common playback buttons, a playback meter, and the playback status panel. The playback meter indicates the play progress and allows you to move forward and backward during the playback by using its scroll bar. The Playback Status Panel displays the channel number, date/time of the recorded file, and the playback speed.
5.2.4 Saving a Snapshot or AVI movie
The RPB application allows you to save a snapshot of the video in *.bmp format or a complete video event in *.avi format.
Save as AVI movie
You can convert a complete video event into AVI movie so others can play it on other computers equipped with AVI player, e.g. Windows Media Player, Real Player. Select a downloaded file from the workstation and click the [AVI] button. Specify where you want to save your movie and click [Save].
Save as Snapshot
To capture a snapshot simply click pause while playing a video, and then click on the [Snapshot] button. Specify where you want to save your image and then click [Save].
|
 Surveillance


